Key takeaways
- Start at ISO 1600 to 3200, an exposure of 10 to 12 seconds on the 1x lens, focus set by hand on a star, and a white balance near 4000 K. Shoot RAW from a steady tripod.
- The exposure time is limited by the rotation of the sky. The rule of 300 gives about 12 seconds for the 1x lens and about 23 seconds for the 0.5x lens, and the rule of 500 is more generous but less safe on a phone.
- An iPhone has a fixed aperture, so the three settings you really control are ISO, exposure time and focus. Raise ISO before you lengthen the exposure.
- The Moon is the odd one out: it is bright, so use the lowest ISO and a very short exposure.
The four settings that matter
Four settings decide most night sky pictures on an iPhone: the exposure time, the ISO, the focus and the white balance. The aperture does not belong on the list, because every iPhone lens has a fixed aperture, so the camera cannot open wider.
The exposure time is how long the shutter stays open, and it is limited by how fast the sky turns. The ISO sets how strongly the sensor signal is amplified, so a higher number brightens the picture and adds noise. The focus must be set by hand, because autofocus fails in the dark (see our focus guide). The white balance sets the colour (see the white balance guide). If you use AstroNight’s manual camera, all four are controls on the screen.
Exposure time: how long before the stars trail
The earth turns by about 15 degrees every hour, so a long exposure turns each star into a short line. The old rule of 500 says to divide 500 by the focal length to get the longest exposure in seconds. On a modern high resolution sensor the rule is too generous: PetaPixel calls it “a very inaccurate rule today” and points to the more careful NPF rule, which also takes the aperture and the size of the pixels into account. A phone has very small pixels, so a safer choice is the rule of 300, using the 35 mm equivalent focal length.
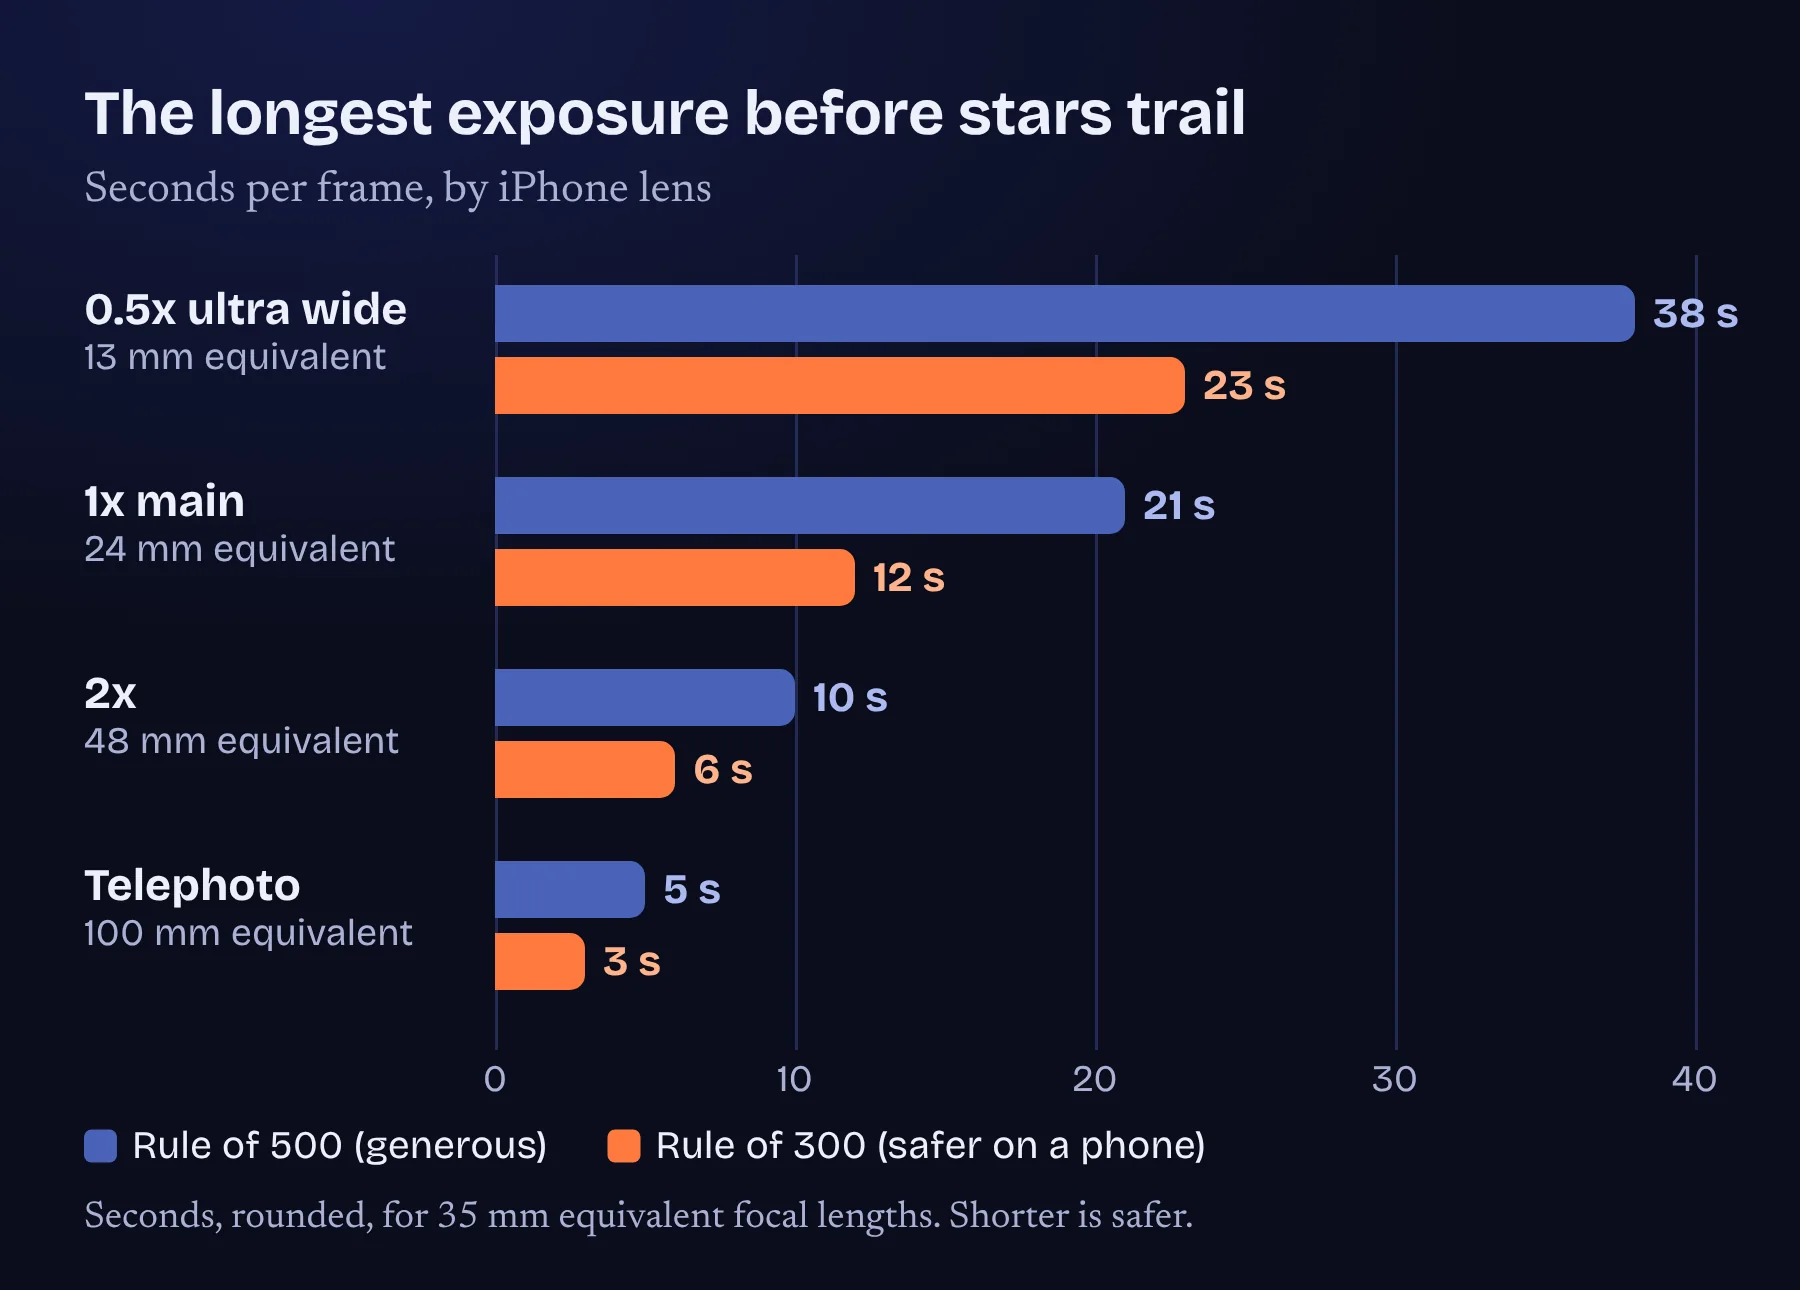
| Lens | 35 mm equivalent (approx.) | Rule of 500 | Rule of 300 |
|---|---|---|---|
| 0.5x ultra wide | 13 mm | 38 s | 23 s |
| 1x main | 24 mm | 21 s | 12 s |
| 2x | 48 mm | 10 s | 6 s |
| Telephoto | 100 mm | 5 s | 3 s |
Two more things help. Stars near the celestial equator, in the south, move fastest, and stars near Polaris move much more slowly, so a frame aimed north can take a longer exposure. And if the stars are trailing, you can always shorten the exposure and raise the ISO, or take more frames and stack them.
ISO: how bright, how noisy
| ISO | What you get | Use it for |
|---|---|---|
| 100 or lower | The cleanest picture, but it needs plenty of light | The Moon and twilight |
| 400 to 800 | Clean, but dark in a night sky | A moonlit landscape and the frames of a star trail in a brighter sky |
| 1600 | A good all-round starting point | The Milky Way and the aurora under a dark sky |
| 3200 and above, if your phone offers it | Bright, with visible noise | Faint aurora or a very dark sky, when the exposure cannot be longer |
The range your iPhone offers depends on the model, so use the nearest value it gives you. If a test frame is too dark, raise the ISO before you lengthen the exposure, because a longer exposure is what makes the stars trail. Noise is what you pay for a higher ISO, and the answer to noise is to stack many frames, not to lower the ISO until the sky disappears.
Starting settings for five subjects
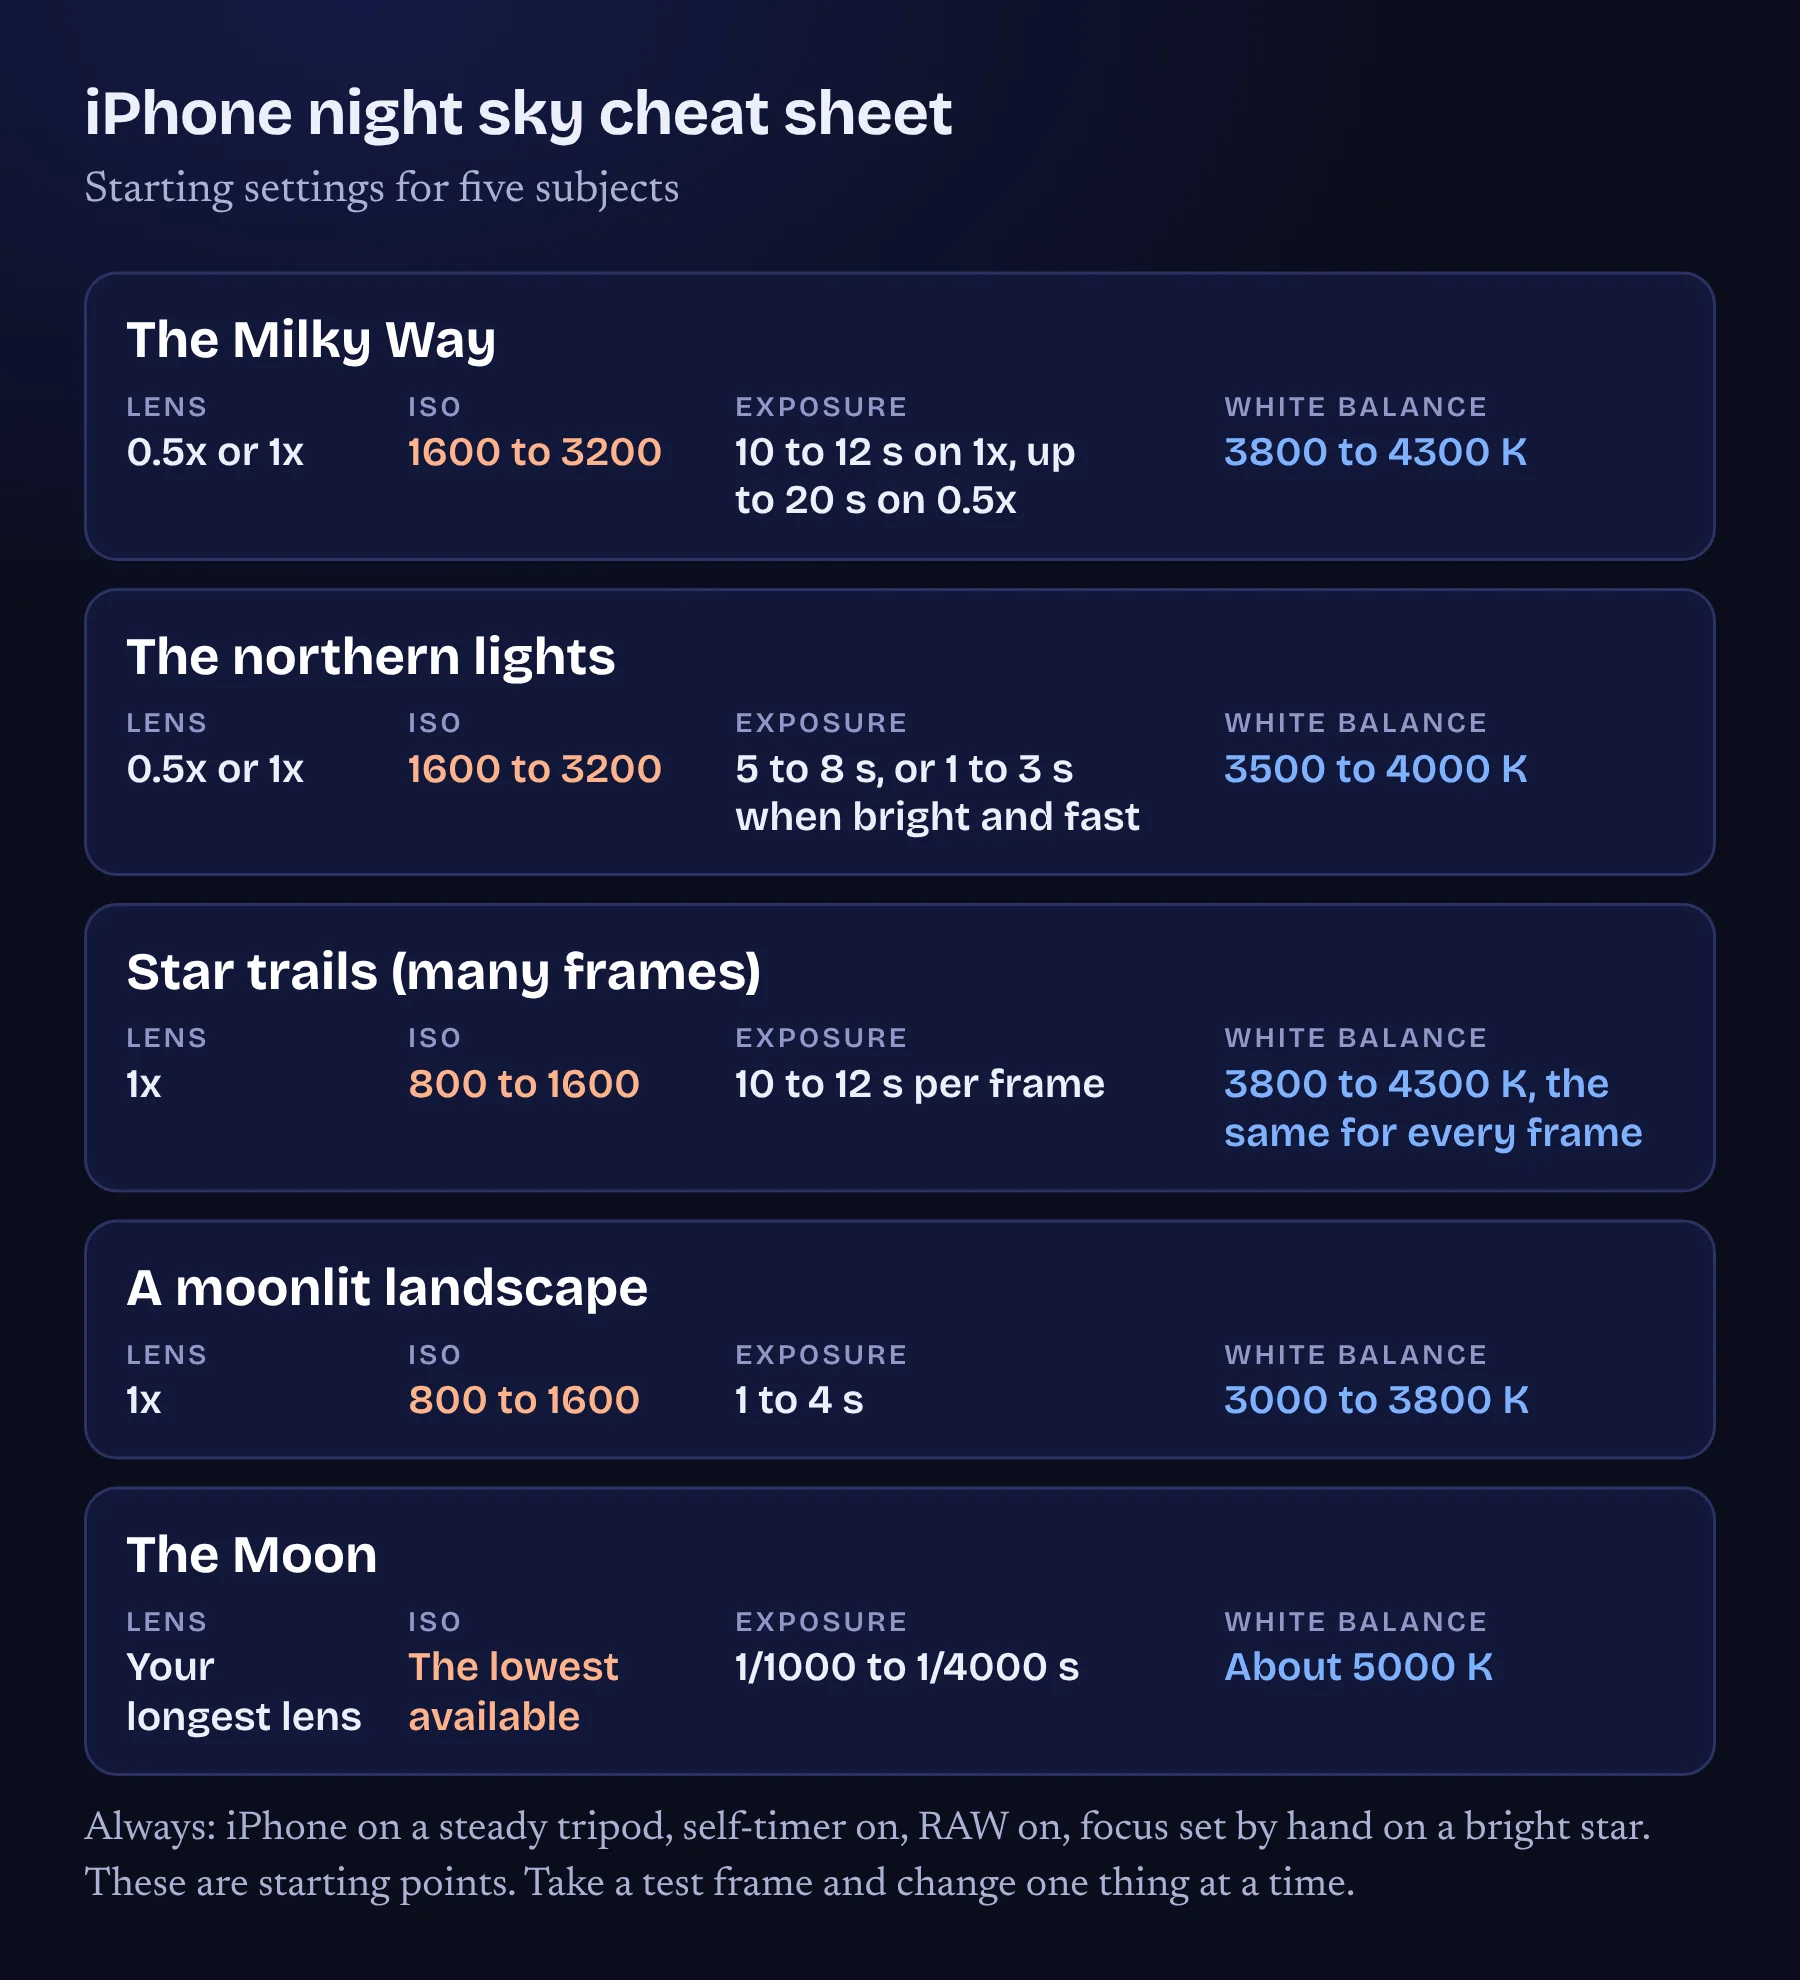
| Subject | Lens | ISO | Exposure time | White balance |
|---|---|---|---|---|
| The Milky Way | 0.5x or 1x | 1600 to 3200 | 10 to 12 s on 1x, up to 20 s on 0.5x | 3800 to 4300 K |
| The northern lights | 0.5x or 1x | 1600 to 3200 | 5 to 8 s, or 1 to 3 s when bright and fast | 3500 to 4000 K |
| Star trails (many frames) | 1x | 800 to 1600 | 10 to 12 s per frame | 3800 to 4300 K, the same for every frame |
| A moonlit landscape | 1x | 800 to 1600 | 1 to 4 s | 3000 to 3800 K |
| The Moon | Your longest lens | The lowest available | 1/1000 to 1/4000 s | About 5000 K |
Focus is the same for all of them except the Moon: set it by hand on a bright star, check a test frame at 100 per cent and leave it alone.
Notes on each subject
The Milky Way. Use the ultra wide or the main lens in a dark place and take many frames. Remember that, from Finland, you will see the northern part of the Milky Way rather than its bright core, as this article explains.
The northern lights. The aurora moves, so shorten the exposure when it is bright and quick, to keep its shapes. Our aurora guide explains the forecast and the best months.
Star trails. On a phone it is best to take many short frames and combine them, instead of one long one, as the star trails article explains. Keep the white balance and the focus the same on every frame. Sixty frames of 12 seconds cover only about 12 minutes of sky, which makes a short arc, so expect to need much more for long trails.
A moonlit landscape. A moon makes the foreground bright, so you need much shorter exposures than for the Milky Way. Start at about one to four seconds and read the histogram.
The Moon. It is a bright, sunlit object, so use the lowest ISO and a very short exposure, and expect to need your longest lens. Start near 1/2000 second and adjust until you can see the craters and the dark seas.
How to adjust after the first frame
| The test frame is | Change | Why |
|---|---|---|
| Too dark | Raise the ISO a step | It brightens without trailing the stars |
| Too bright, or the sky is grey | Lower the ISO or shorten the exposure | A bright sky from the moon or a town fills the frame |
| Stars stretched | Shorten the exposure | The sky turned during the shot |
| Stars soft but round | Refocus | The focus has moved or was never right |
| Colour looks wrong | Change the white balance, or fix it in RAW | See the white balance guide |
A bright sky, whether from the moon or from a town, shortens the exposure you can use before the picture is washed out. The Bortle article explains why, and reading a test frame shows how to tell which problem you have.
Frequently asked questions
What are the best iPhone settings for the Milky Way?
Start at ISO 1600 to 3200, an exposure of 10 to 12 seconds on the 1x lens or up to about 20 seconds on the 0.5x lens, focus set by hand on a bright star, and a white balance of about 3800 to 4300 K, shooting RAW from a tripod.
What ISO should I use for stars on an iPhone?
ISO 1600 is a good start. Raise it if the frame is too dark, and use the nearest value your phone offers.
Does the rule of 500 work on an iPhone?
It is too generous for a phone. The rule of 300 with the 35 mm equivalent focal length is safer, which gives about 12 seconds for the 1x lens. Check your first frame for trailing.
What settings should I use for the northern lights on an iPhone?
Try ISO 1600 to 3200 and 5 to 8 seconds, and shorten it to 1 to 3 seconds when the aurora is bright and moving fast. Use the 0.5x or 1x lens and a white balance of 3500 to 4000 K.
What settings should I use for the Moon on an iPhone?
Use your longest lens, the lowest ISO, and a very short exposure, from about 1/1000 to 1/4000 second, and adjust until the craters are visible.
Why can I not change the aperture on an iPhone?
iPhone lenses have a fixed aperture, so brightness comes from the ISO and the exposure time.
Sources and further reading
AstroNight is now on the App Store. The free planner, coach and manual night sky camera works on iPhone and iPad with iOS 17 or later, offline, with no account. Get it on the App Store.