Key takeaways
- AstroNight now includes a manual camera. You set ISO, exposure time, focus and white balance yourself, choose the lens (0.5x, 1x or 2x), pick the number of shots, use a self-timer and save RAW.
- Automatic camera modes guess the exposure, the focus and the colour in the dark, and the guesses change from frame to frame. A manual camera lets you fix them and repeat them.
- Scene presets such as the Milky Way core suggest a starting plan, and you change it from your first test frame.
- It is honest about its limits: an iPhone has a small sensor and a fixed aperture and it cannot follow the stars, so it will not match a large camera on a tracker. It can make a good picture of the Milky Way, the aurora, the Moon and star trails.
What is new in AstroNight
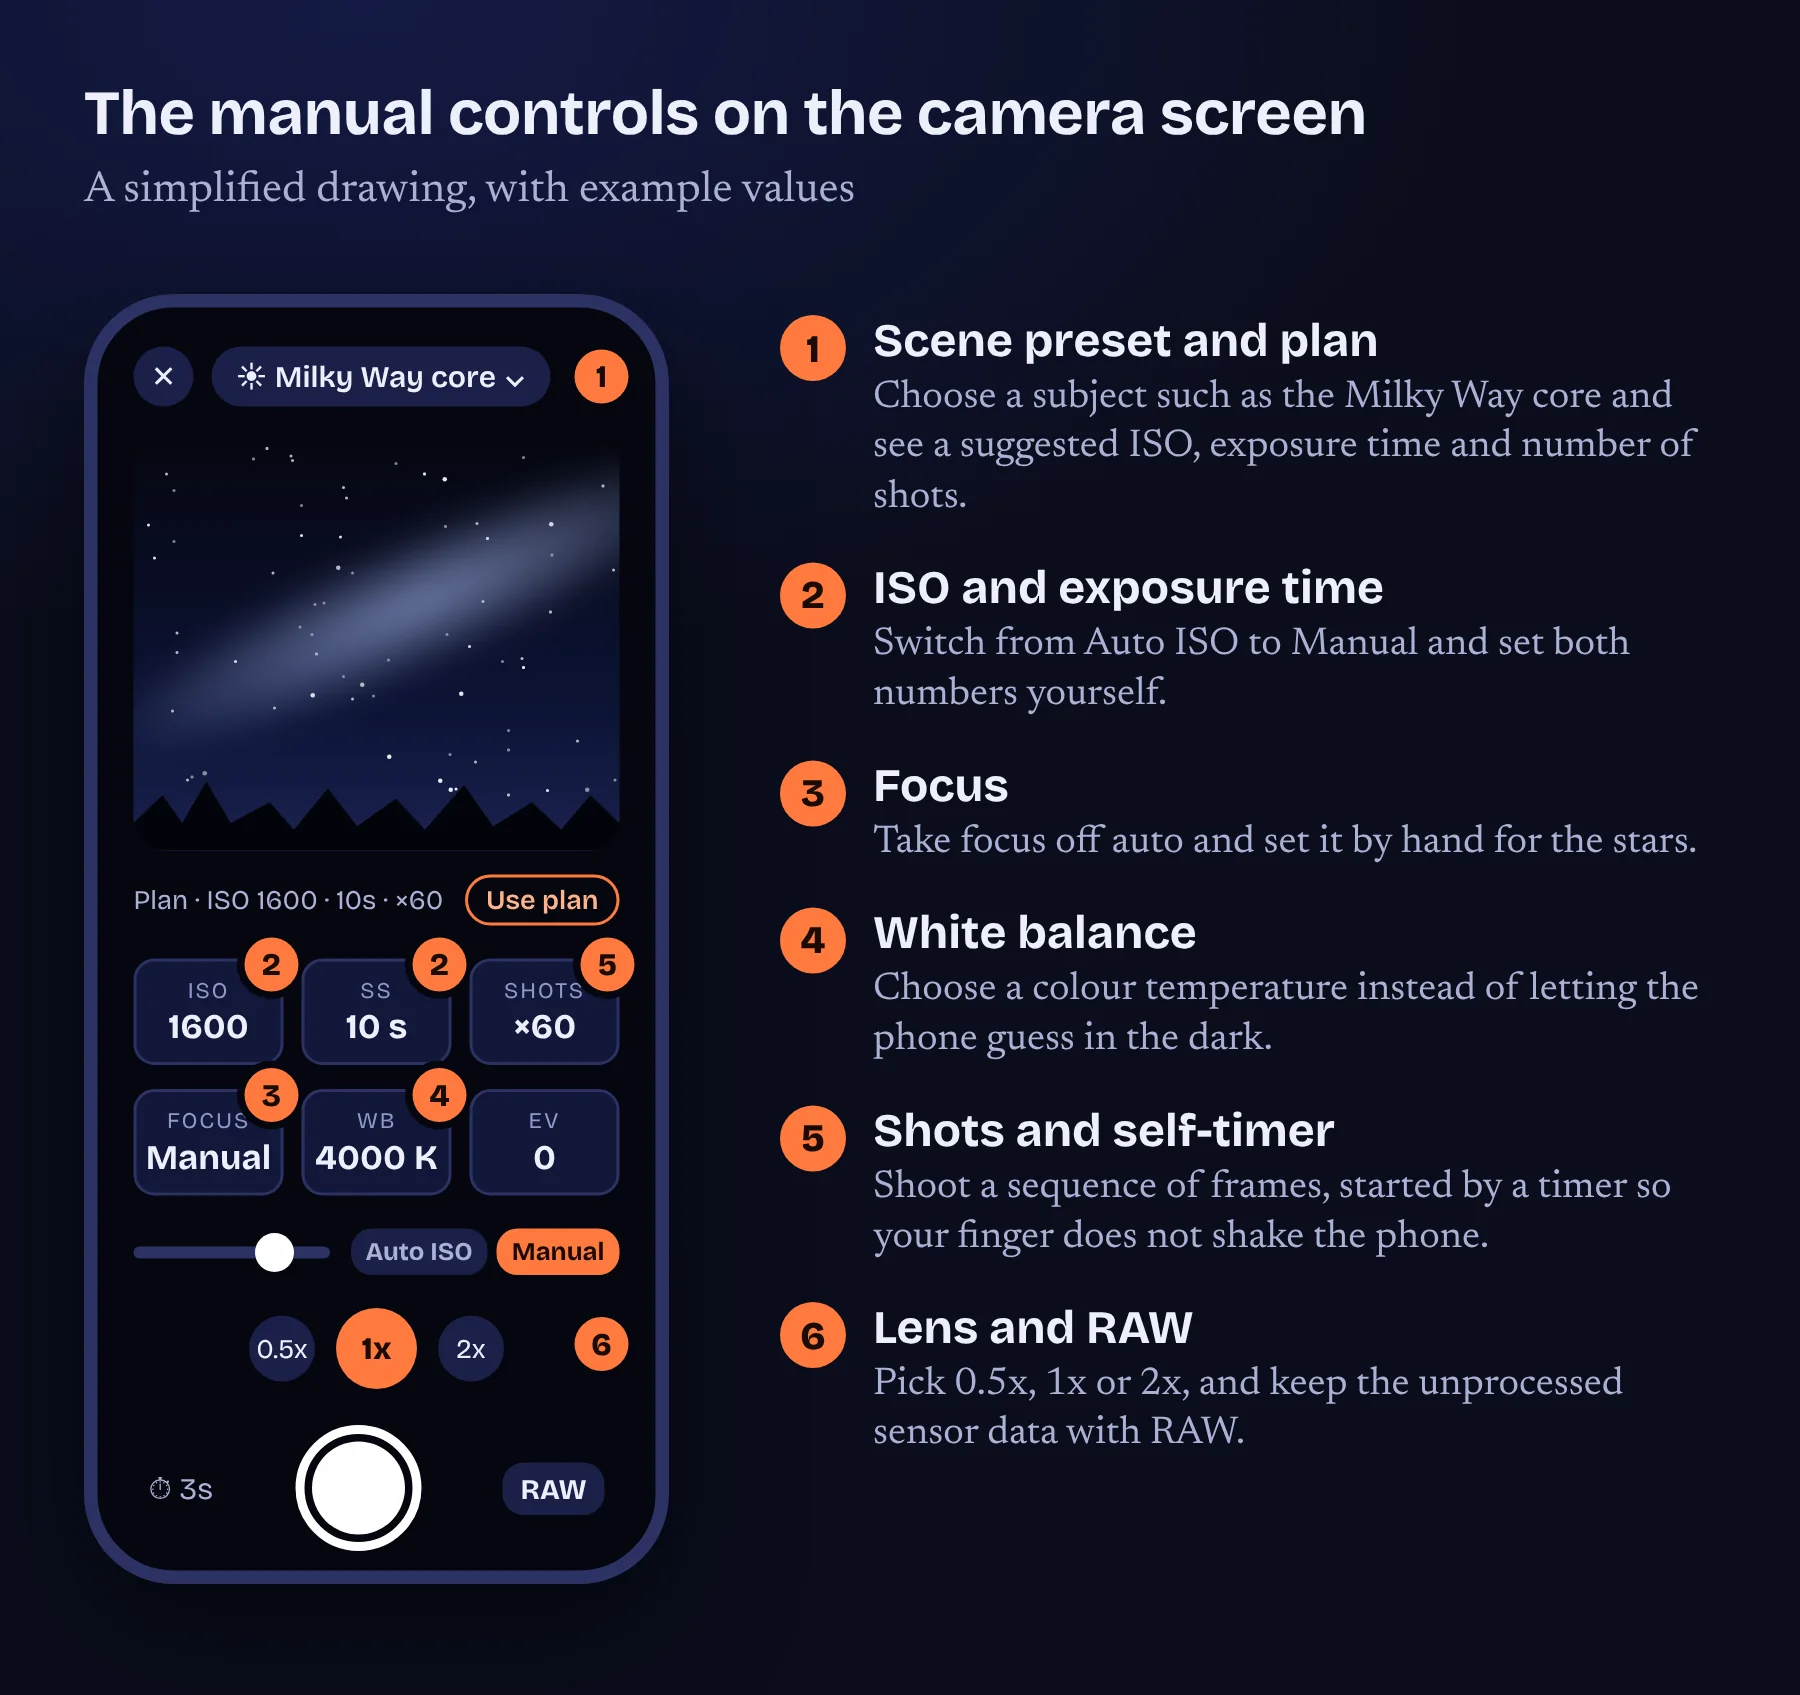
AstroNight now has a manual camera for the night sky. In the camera you set the ISO, the exposure time, the focus and the white balance yourself, choose between the 0.5x, 1x and 2x lenses, decide how many shots to take, start them with a self-timer and keep the unprocessed RAW data. A scene preset, such as the Milky Way core, shows a suggested plan that you can use as it is or change.
Until now AstroNight was a planner and a coach: it chose a target, gave starting settings and checked the frames you imported. It could tell you what to set, but you had to go to another app to set it. The camera closes that gap, so that the plan, the shot and the check live in one place. The update is available now from the App Store.
Why a night sky camera needs manual controls
Automatic modes are designed for a person holding a phone in a lit room, and the sky is the opposite problem. There is almost nothing for the autofocus to lock on to, the exposure meter sees a mostly black frame and tries to brighten it, and the automatic white balance looks at a scene with no neutral grey and makes a different choice each time.
Apple’s own Night mode deals with this well for everyday scenes. It measures the light, chooses how many frames it needs and takes them over a period of time, which according to MacRumors’ guide can run from one to 30 seconds depending on how steady the phone is and how dark the scene is. That is a clever default, but it is still the phone’s choice, not yours.
For the stars you usually want something more specific. You want a particular exposure time, short enough that the stars stay round (we explain how to work that out in our settings guide), a particular focus that you have set on a real star, and a white balance that does not drift. When these are fixed, every frame matches the last one, and that is also what makes it possible to stack many frames into a cleaner picture.
The controls, one by one
| Control | What it changes | A sensible start | Read more |
|---|---|---|---|
| ISO | How strongly the sensor signal is amplified. Higher is brighter and noisier. | 1600 for a dark sky | Settings guide |
| Exposure time | How long the shutter stays open. Longer gathers more light, but the stars start to trail. | 10 to 12 seconds on the 1x lens | Settings guide |
| Focus | Where the lens is focused. At night you set it by hand on a bright star. | The far end of the range, then fine tune | Focus guide |
| White balance | The colour temperature that the phone assumes, which sets how warm or cool the picture looks. | About 4000 K for a dark sky | White balance guide |
| Shots | How many frames to take in a sequence. | 60 frames is a good start for stacking | Stacking article |
| Self-timer | A delay before the shutter opens, so that your finger does not shake the phone. | 3 seconds | Beginner guide |
| Lens | How much sky you capture: 0.5x is the widest and 2x is tighter. | 0.5x or 1x for the Milky Way | Beginner guide |
| RAW | Whether the unprocessed sensor data is kept, so that you can fix colour and brightness later. | On | RAW guide |
From plan to frame, and back again
The camera is part of a loop that AstroNight was already built around. You plan the night, you shoot, you check what you shot, and you change one thing before you shoot again. A scene preset such as the Milky Way core shows a plan with an ISO, an exposure time and a number of shots, and one tap puts those values into the camera. You can then adjust any of them by hand.
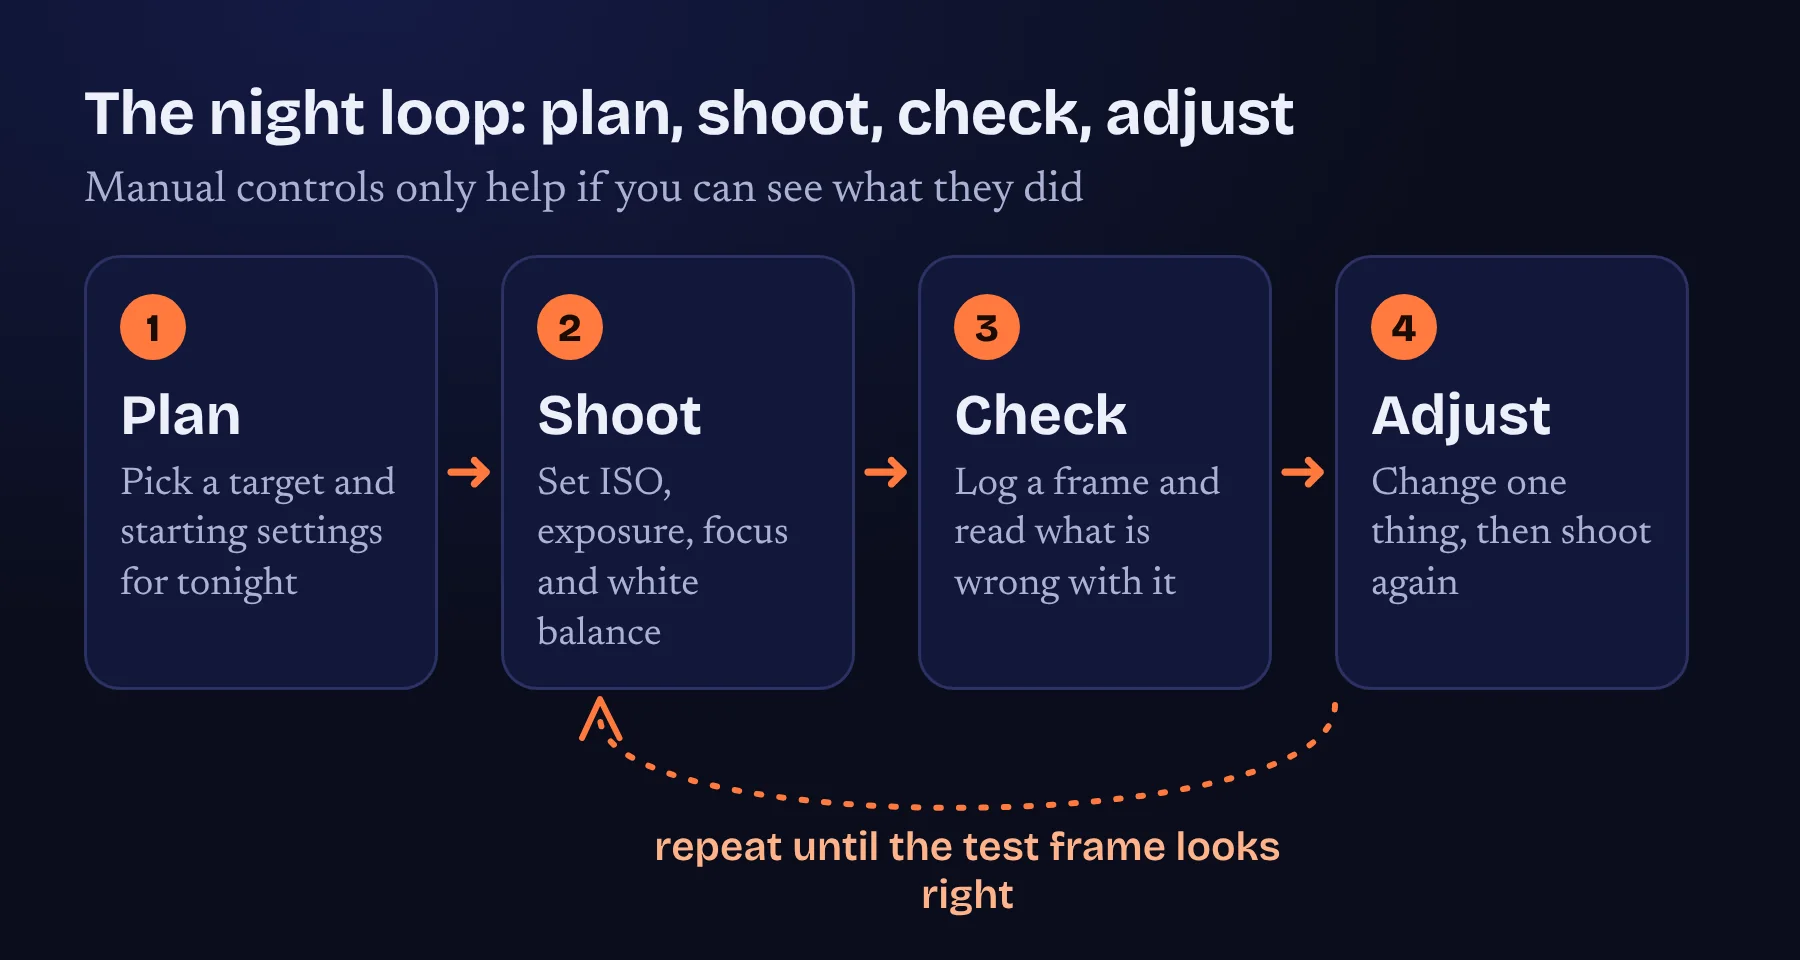
After a test frame, reading it at 100 per cent tells you whether the stars are sharp, whether the corners are dark and whether the colour is believable. Change one setting, shoot again and compare. Keep notes, because the night that taught you the most is the one you can repeat.
Night mode or manual: which should you use?
| Automatic Night mode | A manual camera such as AstroNight’s | |
|---|---|---|
| Who chooses the exposure | The phone, within the options it offers | You |
| Focus | Automatic, which can hunt in the dark | Set by hand and locked |
| White balance | Automatic, and it can change between shots | Set to a value and kept |
| Repeatable frames | Each shot is the phone’s fresh decision | Every frame uses the same settings |
| Best for | Quick pictures of an everyday night scene, a moonlit street or a snapshot of a bright Moon and sky | The Milky Way, the aurora, star trails and any sky you may want to stack or edit |
Neither is better in every case. If you want a quick picture of a street at night, the automatic mode is ideal. If you want to photograph faint things in a dark sky and to repeat and improve the result, take control.
What the camera does not do
We would rather be clear about the limits than let you find them in a cold field. An iPhone has a small sensor and a lens with a fixed aperture, so it gathers far less light than a large camera and it cannot be opened wider. It has no tracking mount, so the rotation of the sky limits how long a single frame can be before the stars trail. And although a phone can record the Milky Way and the northern lights, the picture will be noisier than one from a large sensor.
The exact ranges you can use, such as the longest exposure and the highest ISO, depend on your iPhone model and its software. AstroNight still does not forecast cloud, so a weather app is still a good companion, as our comparison of astrophotography apps explains.
Get started in six steps
- Update AstroNight. Install the latest version from the App Store. It needs iOS or iPadOS 17 or later.
- Mount the phone. Put the iPhone in a clamp on a steady tripod, and clean the lens with a soft cloth.
- Choose a lens and a scene. Pick 0.5x, 1x or 2x, and choose a scene such as the Milky Way core to see a suggested plan.
- Set focus by hand. Take focus off auto, and set it on a bright star or planet, then leave it alone.
- Set ISO, exposure time and white balance. Switch from Auto ISO to Manual, enter your values or use the plan, and turn RAW on.
- Shoot with the timer, then check. Start the self-timer so that you do not shake the phone, then look at the first frame at 100 per cent and adjust.
Frequently asked questions
What can I set by hand in the AstroNight camera?
You can set ISO, exposure time, focus and white balance, choose the number of shots and use a self-timer. You can choose the 0.5x, 1x or 2x lens and switch on RAW. A scene preset shows a suggested plan that you can use or change.
Can an iPhone really photograph the Milky Way?
Yes, in a dark place and on a tripod. A common starting point is ISO 1600 and about 10 to 12 seconds on the 1x lens. The result will be noisier than a picture from a large camera, and stacking many frames helps. See our settings guide for details.
Do I need a tripod?
Yes. Exposures of several seconds need a steady support, and a small tripod with a phone clamp is enough. Use the self-timer so that you do not shake the phone when you start the shot.
Should I shoot RAW?
Yes, if you plan to edit the picture. RAW keeps the unprocessed sensor data, so you can change the white balance and brightness later without baking in the phone’s choices.
Which iPhones does it work on?
AstroNight needs iOS or iPadOS 17 or later. The ranges of ISO and exposure time you can choose depend on your iPhone model, and the camera shows what your device offers.
Does it replace the Camera app?
No. The Camera app is excellent for everyday pictures. AstroNight’s camera is for the night sky, where you want control and repeatable settings.
Sources and further reading
AstroNight is now on the App Store. The free planner, coach and manual night sky camera works on iPhone and iPad with iOS 17 or later, offline, with no account. Get it on the App Store.